There is a common theme when I’m on Facebook looking through the various business and entrepreneur groups that I’m in, and it’s people always inquiring about the best email marketing tool.
I’ve had a MailerLite account for about 4 years and I have yet to read anyone recommend their services. Not out of shame or disapproval, but for the shear fact they’ve never heard of this gem of an email tool.
Like many industries today, email marketing has been monopolized by the same big players for the last decade. Companies like, Aweber, GetResponse and MailChimp, just to name a few have dominated the field. Which means they get promoted the heaviest and achieve most of the market share.
However, every now and then a new contender steps into the market causing you to consider your options.
Thats exactly what MailerLite has done.
Though they are relatively new when it comes to the world of email marketing, their youthfulness is ingrained throughout their designs and features.
So today in this Mailerlite review, I’ll be going further into detail on MailerLite to see if it stands tall or if it falls to the competition.
MailerLite Review 2023
Pro’s & Cons
Pros
- Free Plan (1000 subscribers)
- Easy To Use
- Clean and Sleek Editor
- Supports Automations and Workflows
- Powerful Segmentation Rules
Cons
- Missing some pro features
- Strict Approval Process
- Can’t create emails without leaving the visual workflow editor
- Can’t use form building templates in free plan

The Approval Process
Like every other email marketing service, you have to go through an approval process before they allow you to use their software.
After you have created your account, you’ll be asked to complete your profile.
They will ask for your name, your company name, address, website, industry, company size, list size and the type of content you plan on sending to that list.

Now you are going to need to verify that website. The MailerLite team will manually verify that you have a fully functioning website. They are very strict on the fact that it need not be a social media page, redirect, landing page or coming soon page. It must have content!
MailerLite will ask which email is associated with that website (name@domain.com), so that they can email you a verification link.

After you’ve completed those steps, it’ll be a short waiting process.
The MailerLite team will review your application, check your website and come to a decision on whether they will approve your account or not. This usually happens within 12 hours.
They do this to make sure you are a good fit for their service. They don’t want spammers who will abuse their system and compromise deliverability rates for the community as a whole.
In a meantime, MailerLite allows you to have access to the software to create campaigns and mess around with the features, but you won’t be able to send emails until your account is approved.
Once I signed up and got approved, I was surprised to see that it was with no restrictions. Some people’s free account has only been approved for 500 subscribers out of the 1000.
So I would have to say that it will vary from person to person. I believe it depends on your website, industry and the type of emails you intend to send to your list. But I also think that it’s based on an algorithm as well.

On the other hand, if your account is not approved, there really is no explanation as to why and what the main reason for disapproval. All you get is a notification shown below.

If you ask for further clarification on your account status from their support team, you get a response saying it’s ultimately up to their algorithm and they cannot do anything. It’s really not helpful.

Subscriber Management
One of the most important aspects of email marketing today is having complete control over your subscribers.
You may be asking how so?
If you are looking to increase your open rate, clicks, and most importantly your conversions, then it’s absolutely necessary to have highly personalized campaigns.
You’re going to notice two sections when you open your subscribers dashboard; Groups and Segments.

In MailerLite, Segments are basically your rules, but you’ll notice they use the term conditions.
Your subscribers only belong to a segment once certain conditions are met, and will be added or removed automatically.
Here’s what setting up a condition looks like:

You can do quite a bit with these conditions. You can add and alternate them, even if they don’t exist.
The next tab is Groups.

Groups act sort of like Tags. You can create a specific group for you subscribers. So a different group can be attached to a different email list.
Unlike Segments, Groups are updated manually through different automation rules or conditions. All you need to do is come up with a name for your specific groups.

As you begin to familiarize yourself with the MailerLite platform, you’ll understand where groups and segments are typically used, as shown above.
I know it seems confusing, but trust me, it’s much simpler once you get your hands on the software.
Let’s make are way to the fields tab. This is where you’re able to personalize your email copy.
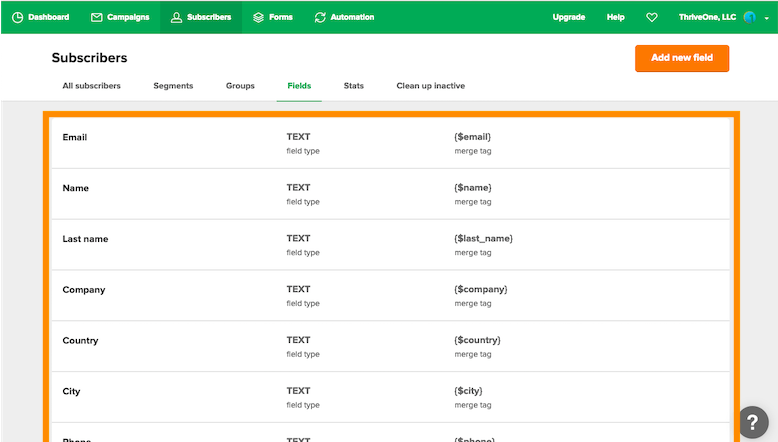
You’ll notice MailerLite has done the hard work and populated this section with their own fields, such as name, company and city.
If you’d like to create your own fields, you can do so by clicking the “Add new field” button in the top right corner.

So how does adding a new field work?
You can add these fields into your forms or you can upload a CSV file of all your current subscribers with your custom fields in separate columns.
I won’t get too deep into form stuff here, because I have an entire section dedicated to it below. But once you’ve collected your custom field data from new subscribers, you can pull those into your email subject line and content.
Just click the “Personalization” dropdown and select your custom field.

This is just the tip of the iceberg. There are so many different possibilities when it comes to custom fields. Just know this feature is available to add a personal touch to all your emails.
Email Campaigns
Inside my MailerLite, I use automations to handle the majority of my email marketing.
But we will get to automations shortly…
First, we all need that one feature for sending out notifications for new blog posts, youtube videos and general announcements.
That’s where “Campaigns” come into play.

Clicking the button “Create Campaign” will give you several different options.
- Regular Campaign: Broadcast Email.
- A/B Split Campaign: Multiple email variations (including subject line, name, and content).
- Auto Resend: Resend broadcast to subscribers who don’t open the first time, with the option to change subject line and content.
- RSS Campaign: Create a recurring campaign that sends new content to subscribers using your website’s RSS feed.

Creating these campaigns are fairly simple, most will follow the same step-by-step process of a standard campaign.
So let’s take a quick walk-through.
Once you choose your campaign, you’re going need to click the “Content” button.
On the next page you will select “Start from scratch”. This is where you can design your email using their new drag and drop editor.

In the past they used to have 21 templates to choose from in their gallery. They’ve since then added to it and right now it’s currently only available for paid plans.
Which means you only have the option to use Drag and Drop with the Free plan.
But, I find the editor to be more fun anyways. So let’s get started with it.

The editor is easy to work with, which makes customizing emails a 2-minute job..literally!
You can customize your logo, header and content area however you like using the sidebar on the left. Then you can use different block types for formatting how you want your content to fit.
And you can customize your actual content, buttons and footer in the individual settings on the right sidebar.
After making changes, just click “Done Editing” and you’ll be taken to the recipients options where you can select your groups or segments.

The advance tab also allows you to build segments just in case you you need make some last min targeting adjustments.
Now right before you “Review and Confirm”, you’ll be taken to the schedule screen.
This is where you can control when your broadcast goes out. You can choose to send now, send later or deliver based on time-zone.

Pretty cool right?
Form Builder
Surprisingly, MailerLite offers a pretty good set of form building widgets. Coming from me, that’s a lot, because most email marketing tools on the market have horrible form builders.
But I digress.
MailerLite can also create pop-up and landing pages through their interface. So stay with me as we cover some of these things.

So let’s start with your standard forms. This are the forms that you typically would embed in your blog.
These forms are created within MailerLite, then you are given an embed code, which allows you to place the form on a specific page, post or even site-wide.
So when you first start the creation, it’ll look super basic. Don’t worry, the form designer allows you to customize everything from the form style, fields, background, title, input fields and even your button.
You can also edit your form text directly, giving you the chance to visualize what your copy will look like in real-time.

Having some templates here would be awesome, but this is still better than some of the other email services out there.
Clicking the ‘Settings’ tab will allow you to configure how the form functions, including adding additional fields and setting a custom success page.
(There’s also a GDPR compliance option as well.)

If you noticed..there is also a success page.
MailerLite also lets you customize the default message, which then replaces the embedded form and prevents users from redirecting.

Before we wrap this section up, you can also view how your form will look on mobile. All you have to do is click “preview” and toggle from desktop to mobile.
You won’t be able to make any design changes here, but it makes sense to check.
You can also create pop-up and slide-out forms as well. The process of creating them is pretty much the same as the regular forms, so there’s no need for me to go over those.

MailerLite won’t be replacing landing page builders like Thrive Architect, but their form builder still does a pretty good job.
Automation
What’s email marketing without some automation?
Now if you’re reading this, than this is most likely the most important part of this review.
The good news? If you’ve ever used a visual workflow builder, then you’ll fell right at home.

As you’ve already seen inside of MailerLite, much of the interface is clean and simple to navigate. Automations are no exception — something that can’t be said for much of the competing email services out there.
After setting your trigger, you can begin adding steps to your workflow.
As shown in the photo, this can be anything from emails, time delay’s, conditional splits and actions.
Here’s a simple test workflow I put together, where subscribers are unsubscribed if they don’t open my email within 10 days.

The possibilities are endless when it comes to workflow automations like this, and MailerLite should have no issue fulfilling them.
I’ll be honest though, MailerLite isn’t as feature rich yet, but they have been making consistent improvements to improve the platform.
For example, not long ago they didn’t have the ability to move subscribers to a different automation. Now you can place them into a group that has automations you would’ve customized.
Problem solved…
Let’s talk about creating new emails in the workflow builder.
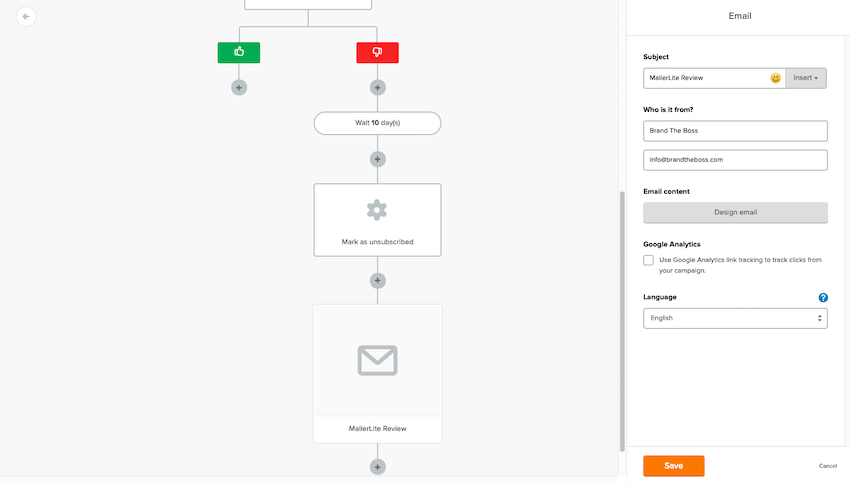
After adding an email block to the workflow, you’ll be asked to add your subject line which is on the block itself.
From there, clicking the ‘Design email’ button will open up the editor:

You’ll be redirected to the content editor, similar to the one I covered earlier in the review.
Once you’ve added your content and clicked “Done Editing”, you’ll be taken back to the automations workflow builder.

Finally, your email will be loaded into your automation.
MailerLite has added a nice touch by allowing you to preview your email in a thumbnail within the automation block, so you can see how it’ll look to your readers.
But overall it’s quite a quick process to create your emails.

Tracking & Reporting
Like most email marketing tools, you’ll find a summary of your campaign statistics in the main dashboard.
Here you’ll see everything from campaign opens and click data, subscriber growth, automation stats, and your form signups.

MailerLite’s dashboard is a very clean and sleek interface. All of your overall statistics will be found in this one place.
Your monthly subscriber growth, campaign stats and all of your active automation workflows will be included.

Clicking into any campaign will give you specific reporting for that campaign.
This is where you’ll find some more advanced statistics such as unsubscribes, spam complaints, bounces, reading environment, email client and more.
Overall, MailerLite does a stellar job with their reporting interface, and most will find the available statistics more than enough to meet their needs.
MailerLite Pricing
The cost of MailerLite is obviously one of the platforms biggest selling points, and lets keep it real, we all love a good deal (I rhymed HA HA).
For starters, their free plan includes limited features for up to 1,000 subscribers. Which fits most basic needs for anyone just starting out.
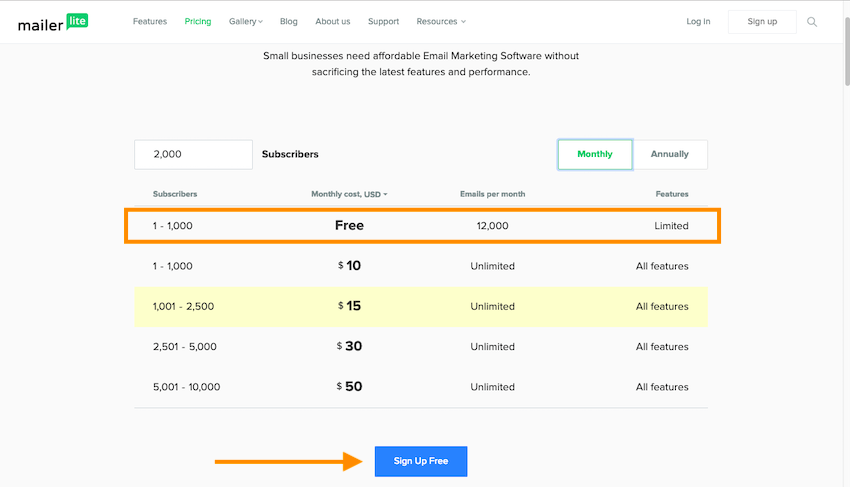
And yes, there is some branding on your emails using this plan, but no one pays attention to that and it’s still a fantastic option for those starting out.
So what about MailerLite’s premium plans?
It turns out they are by far one of the most inexpensive options on the market at around half the price of the competition on average. Plus, if you are willing to pay annually, you can also get an even bigger discount.
In fact, you’ll be hard pressed to find anything that does the same job, cheaper.
Who Should Use MailerLite
After reading all of this, you probably want to know what type of person should be using MailerLite to get the most benefit and value.
You should use MailerLite if:
- You need affordable email marketing with premium features
- You’re a small company with limited capital
- You’re in the early stages of adding email marketing to your online business
- You’re a small business owner, blogger, or freelance marketer interested in email software
But, as with any digital marketing tool, what’s great for one comapny, might not be the best fit for another.
You should consider a different service if:
- you need an email marketing platform with more advanced features, such as sequence funnel builder or workflow automations
- you need detailed reporting
- you don’t have a website/blog. MailerLite requires a domain address to use their service.
There’s a chance you may find MailerLite’s email marketing service slightly limiting. If you find that to be the case, you may need to try different email marketing platforms, like SendX, GetResponse, ActiveCampaign, or ConvertKit.
Conclusion
MailerLite is one of the few email marketing services to shakeup the email marketing industry in recent years, and that’s no simple task. It performs exceptionally well at just about all of its features.
Overall, I find MailerLite to be a perfectly balanced email autoresponder at a price that can’t be beat.
So does it stand tall to the competition..I’d have to say it does, but I’ll let you decide for yourself!
If you’re thinking about giving it try, click the button below and let us know what you think in the comments.
Did This Help You? If so, I would greatly appreciate it if you commented below and shared on Facebook

Mike Garvey JrFounder of BrandTheBoss.com
Work From Home
Want to learn how to start an online business and work from home like I do?
Affiliate Disclaimer: We hope you liked this MailerLite review. Please note that some of the links inside this article may be affiliate links to MailerLite. That means that if you click on one of the links and sign up, we may be compensated for it. If you do happen to click, we really appreciate it! Any money we make keeps this site running smoothly and allows us to keep writing these awesome reviews.
Here are some other posts from our site that you may like:

